Welcome back to another #FixItFriday! On today's installation, we are discussing astragals and how to size them to fit perfectly within your french door system. The astragal is a vertical component between door panels that allows your French door system to lock out unwanted guests, seal out water and air, and keep insects outside your home.
Where is the astragal located?
Located in the center of the two French door panels, the astragal is attached to the inactive door panel, or the panel that is not typically used for entry and exit. The astragal, although located on the inactive door panel, works hard to provide a tight seal against outside elements.
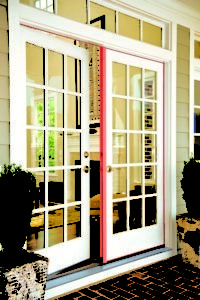
Photo Credit: https://www.bayerbuilt.com/
Astragals should be ordered based on the handing and swing of the active (moving) door panel. If you need help determining which handing and swing fits your door description here is a handy cheat sheet.
Tools required for Astragal cut-down
- Pencil / Marker
- Tape Measure
- Chop Saw
- Flathead Screwdriver
- Phillips Screwdriver
How to cut down your Astragal
If you find that your astragal is just too large for your door, we have the perfect solution: cut-down instructions! With each of our astragal options we provide installation instructions that make the process easier than it appears.
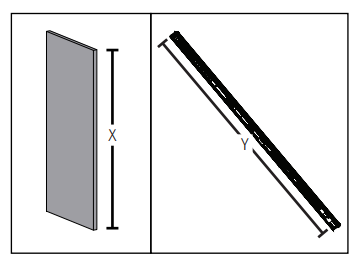
To cut down your astragal begin by measuring the length of the door panel (X) and the length of the astragal (Y) on the narrow edge. After gathering both measurements, round the length of the door panel and astragal to the closest inch. Then subtract the rounded length of the door panel from the rounded length of the astragal to determine your index number.

After determining lengths and index numbers, we will begin removing pieces of the astragal that will not need to be present during our cut-down. If present, remove the trim strip from the astragal body (pictured below).
Continue the initial preparation by removing the orange securing pin, the U-clip and the upper trim cap and tail cap from the astragal body. Rotate the bolt head out of the channel the astragal and slide the bolt assembly out of the astragal.
Next step is to remove the flip lever assembly by disengaging the spring from the spring bracket and spring pivot and set aside. Remove the flip lever assembly and mark the location where the upper flip lever lug aligns with a notch. Be sure to also mark where the lower flip lever lug aligns with the notch in the lower drive channel. Remove the lower flush bolt and both the lower and upper drive bars from the astragal body.
Starting at the bottom of the astragal and measuring along the wide side, measure and mark (X-9/16"). Cut the astragal flush at this location. Insert the tail cap onto the narrow side of the astragal body.
NOTE: If you do NOT have a tail cap available - start at the bottom of the astragal and measure along the narrow side then cut the astragal flush at this location. To re-notch the astragal measure 9/16" from the cut end of the astragal.
Reinstall the flip lever assembly (only if your index number is greater than 4). We are going to want to reinstall the bolts that we previously removed before cutting the astragal body. After completely reinstalling the bolts and flip lever assembly be sure to confirm that your flip lever is operational.
For more detailed installation instructions please click this helpful cut-down document.
NOTE: Depending on the astragal chosen will determine its cut-down instructions. We have included our Ultimate Flip Lever Astragal due to its popularity, but each astragal will vary depending on structure.
To see the cut-down process in real time here is our Ultimate Flip Lever Astragal Cut-Down video.
If you need assistance finding the perfect astragal for your french door system let us help!
Be sure to visit www.betterdoor.com for all your exterior door needs.